As a website owner, you may want to make your WordPress site more visually appealing and engaging to your visitors. One way to achieve this is by using a full-width page layout, which can make your site stand out and provide a seamless browsing experience.
While many premium WordPress themes come with built-in full-width page layouts, you may not be using one of these themes. However, there are several ways you can create a full-width page for your site.
In this article, we will cover the definition of a full-width page and provide you with three methods for creating and laying out a full-width page. Whether you choose to use a plugin or the Elementor page editor, we will guide you through the process step-by-step to ensure that you can achieve the desired result for your WordPress site.
What is a Full-Width Page Layout?
A full-width page layout is a design style where the content of a web page spans the entire width of the browser window, without any margins or padding on either side. This means that the content is stretched from edge to edge, providing a seamless and immersive browsing experience for the user.
In contrast to a standard page layout with margins and padding, a full-width page layout is ideal for showcasing high-resolution images, videos, or other visual elements. It can also help to draw attention to important content on the page and provide a more modern and sleek appearance to your website.
When to Use a Full-Width Page Layout?
A full-width page layout can be used in a variety of situations where you want to create a visually engaging and immersive experience for your website visitors. Here are some examples of when to use a full-width page layout:
Landing pages: A full-width page layout can be used for landing pages to highlight a specific product, service, or promotion, and to draw attention to the call-to-action (CTA) buttons.
Portfolio pages: If you are showcasing your work as a photographer, artist, or designer, a full-width page layout can be used to display your high-resolution images and videos in a way that maximizes their impact.
Product pages: A full-width page layout can be used for product pages to showcase your products and their features with high-quality images and videos.
About pages: A full-width page layout can be used for about pages to tell your brand story with the help of large visuals, graphics, and interactive elements.
Blogs: If you want to create a more immersive and engaging reading experience for your blog readers, a full-width page layout can be used to display your blog posts with large images, embedded videos, and interactive elements.
Contact pages: A full-width page layout can be used for contact pages to highlight your contact information and make it easy for visitors to get in touch with you.
Overall, a full-width page layout can be used whenever you want to make a strong visual impact and create a more immersive and engaging experience for your website visitors.
Using a built-in full-width template in your WordPress theme
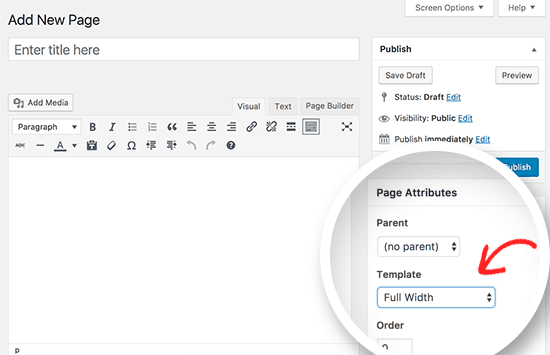
If your theme already comes with a full-width page template then this process can come in handy. Keep in mind that if your theme doesn’t come with a full-width page template then this process can’t be used. Firstly, you need to edit a page or create a new one by clicking the Pages tab and then selecting the option of Add New page.
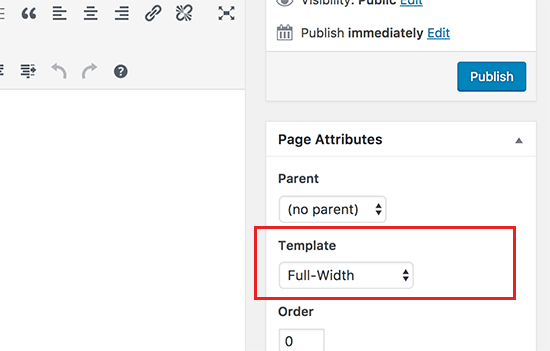
On the page edit screen, you can select full width as your template that you will find under the pages attributes Meta box. Once you get that done, you will have to save your page. Continue to edit the page if you need to add more content and click on the preview button to see progress further.
If you cannot find a full-width template option on your page edit screen then the theme you are using does not have a full-width page template. In that case, go through the steps to see how you can create a full-width page without changing your WordPress theme.
How to create a full-width page template manually?
If you wish to create a WordPress Full-Width page template manually then you will need to have a basic understanding of PHP, CSS, and HTML. You should read how to copy and paste code in WordPress before proceeding. Before you, start dropping codes on the WordPress theme you need to ensure that you have a backup to your current theme. This is needed in case of a crash. You will be able to recover the theme from the saved point if you save it.
Open a plain text editor like Notepad and paste the following code in a blank document:
After that, you will have to save the file with the name full-width.php on your computer. This code simply defines the name of a template file and makes WordPress to fetch the header template. After that, you will need the content part of the code and for that, you will need to connect to your website using the FTP client and then go to /wp-content/themes/your-active-theme-folder/.
After that locate the file named page.php that is your theme’s default page template file. Copy whatever you get after the header code and paste it in the full-width.php file on your computer. Once that is done delete the <?php get_sidebar(); ?> line of code if it exists. This line fetches the sidebar and displays it in your theme. Once it is deleted, it will stop your theme from showing the sidebar when using the full-length width template. If the theme doesn’t display sidebars on pages then you may not find the code in your template file.
The full code will look something like this once all the steps have been completed:
<?php

/*

*

* Template Name: Full-Width

*/

get_header(); ?>
<div id="primary" class="content-area">
<main id="main" class="site-main" role="main">
<?php
// Start the loop.
while ( have_posts() ) : the_post();
// Include the page content template.
the_title( '<h1 class="entry-title">', '</h1>' );
<div class="entry-content">
<?php the_content(); ?>
</div>
// If comments are open or we have at least one comment, load up the comment template.
if ( comments_open() || get_comments_number() ) {
comments_template();
}
// End of the loop.
endwhile;
?>
</main><!-- .site-main -->
</div><!-- .content-area -->
<?php get_footer(); ?>
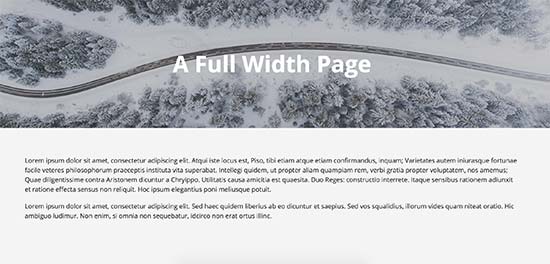
Next, you need to upload the full-width.php file to the theme folder. Now create a full-width page using this full-width template. Search for the page edit screen on the WordPress admin area and click on the drop-down menu under the ‘template’ option. You will be able to see your full-width template here. Save it and update the page. Visit your WordPress site now and you will find that the sidebars are gone. Your page displays as a single column. Use the Inspect tool to find out the CSS classes used by your theme and define the content area. Adjust the width to 100% using CSS and you have a Full-Width Page in WordPress manually.
Create a full-width page using page builder plugin
The easiest and most recommended method you can easily edit your fullwidth page and create different page layouts. Download the WordPress page builder plugin. Different themes are available; however, one of the best is the Beaver Builder plugin.
After activating the plugin on the page edit screen under the page attributes section you will find the fullwidth template option. After selecting the page template click the Save button and your page will be saved. Now go ahead and click on the page builder tab above the page editor. A page launch interface will show up that will allow you to see a live preview of your page with various page builder options.
Easy 3 Click Solution To Get Any WordPress Page Builder To Work With Any Well Coded WordPress Theme
Start by clicking on the templates button on the top. The plugins will offer you with a variety of different templates to choose. Click on the layouts option and you can include rows and modules. If you want a brand new template, you can build one after selecting the blank template option. Open the item details pop up and edit the various settings including the colors, fonts, background photos, etc.
Add modules and widgets to your website if you want. Once you are done you can go forward and click on the dine button at the top. Select the save or publish option and you can now visit your page to see it in action.
Though many people think that creating full-width pages in WordPress is tough it actually isn’t if you know how to go about it. With the three methods shown here, you will be able to set up and launch your very own WordPress full-width page in a few minutes.
Full-Width WordPress Page Using Elementor: Step by step
Creating a full-width WordPress page using Elementor is a straightforward process that involves a few simple steps. Here is a step-by-step guide on how to create a full-width page in WordPress using Elementor:
Step
Description
Step 1
Install and activate the Elementor page builder plugin on your WordPress website.
Step 2
Create a new page in WordPress by navigating to Pages > Add New.
Step 3
Click the “Edit with Elementor” button to open the page in the Elementor editor.
Step 4
Click on the gear icon located at the bottom left of the Elementor interface to access the Page Settings.
Step 5
Choose “Elementor Full Width” as the page layout in the Page Settings to enable full-width page design.
Step 6
Customize your page content by adding widgets, images, videos, text, and other design elements using the drag-and-drop interface and Elementor settings.
Step 7
Click on the Preview button to see how your full-width page will look on the front-end of your website, and then click on the Publish button to make it live.
Creating a full-width WordPress page using Elementor is a quick and easy process. With just a few clicks, you can create a visually appealing and engaging full-width page that will help you stand out from the crowd.
Creating Full-Width Page with Beaver Builder:
To create a full-width page with Beaver Builder, follow these steps:
First, create a new page in WordPress and open it with Beaver Builder.
In the Beaver Builder interface, click on the “Page Builder” tab to access the page builder.
Next, click on the “Settings” icon at the top of the page builder, which looks like a gear wheel.
In the “Page Builder Settings” window, click on the “Layout” tab.
Under “Layout,” select “Full Width” from the “Page Layout” drop-down menu.
Click on the “Save” button to save the changes.
Now, you can begin designing your full-width page by adding rows and modules to the page.
To add a row, click on the “+” icon in the page builder and select “Add Row.”
Choose the row layout you want from the list of options.
To add modules to the row, click on the “+” icon within the row and select the module you want to add.
Customize each module by adding text, images, and other content.
Repeat steps 8-11 to add more rows and modules to the page until you have designed the entire page.
Once you have finished designing the page, click on the “Done” button to exit the page builder.
Lastly, click on the “Publish” button to publish your full-width page to your website.
Conclusion:
Creating a visually stunning and responsive full-width page in WordPress has never been easier with Elementor. Whether you’re looking to impress desktop and mobile users with your design skills or create an immersive webpage that captivates your audience, Elementor provides you with the tools you need to bring your vision to life. With its intuitive interface and drag-and-drop functionality, laying out a full-width page is a breeze, allowing you to focus on creating engaging content and captivating visuals. So why wait? Start using Elementor today to elevate your WordPress website to the next level.