Is there any use of symbols in “Sketch”? Well, let me tell you the Symbols make every task easy in Sketch. As per the opinions from Sketch Experts, symbols make the designing jobs easy and faster. Even freelancers said that by frequent use of symbols, it makes the sketch task an easy one.
Now, you must be thinking of what are symbols used for? Symbols can be said to be used and reused for an element in a project keeping master symbol the same and sometimes changing it as needed by the whole sketch. Therefore, it can be said that the symbols are important elements that help us to form the design in Sketch.
However, if you have to design interfaces, the symbols will play an important role in the whole design system.
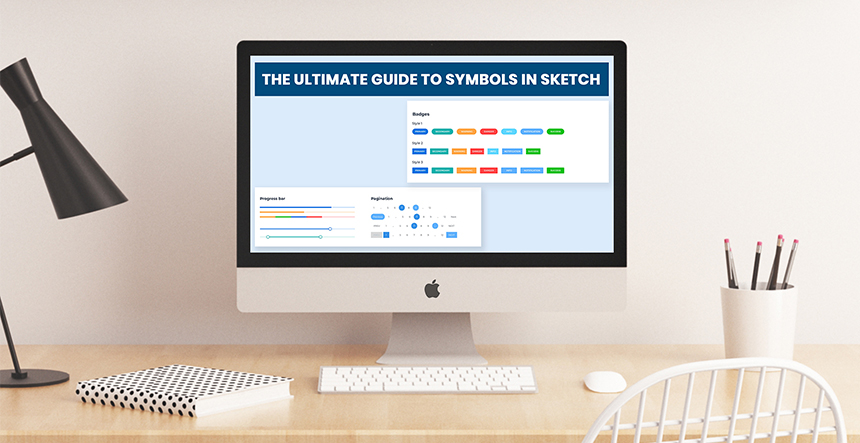
Importance of Symbols in Sketch
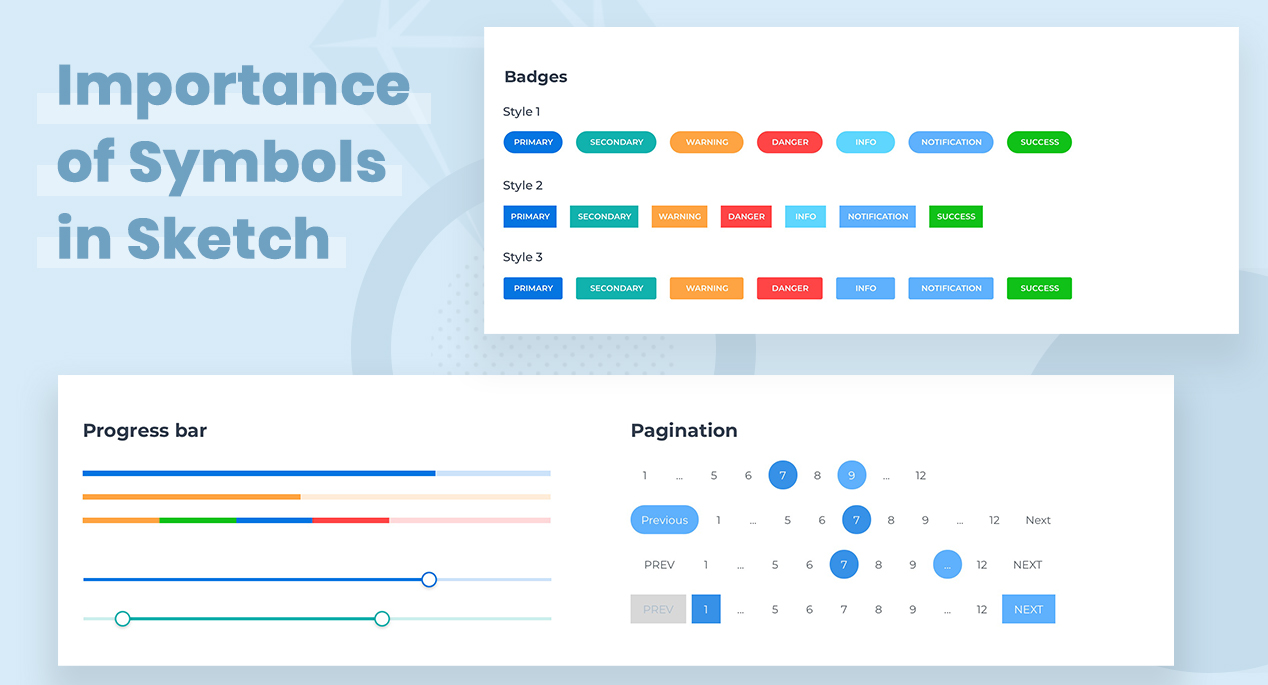
For the beginners in Sketch, symbols are made from shapes, text objects, bitmap images and other related symbols. When using any symbol, the symbol’s layer is contained within the artboard that helps to know the symbol’s boundaries. However, the lists, buttons, tabs and the like are the symbols that can be reused in an interface. If you wish to alter any properties of any symbol, you have to change the master symbol that is convenient to use. Below is a rundown of vital tips that shall help to create the symbols better in the sketch.
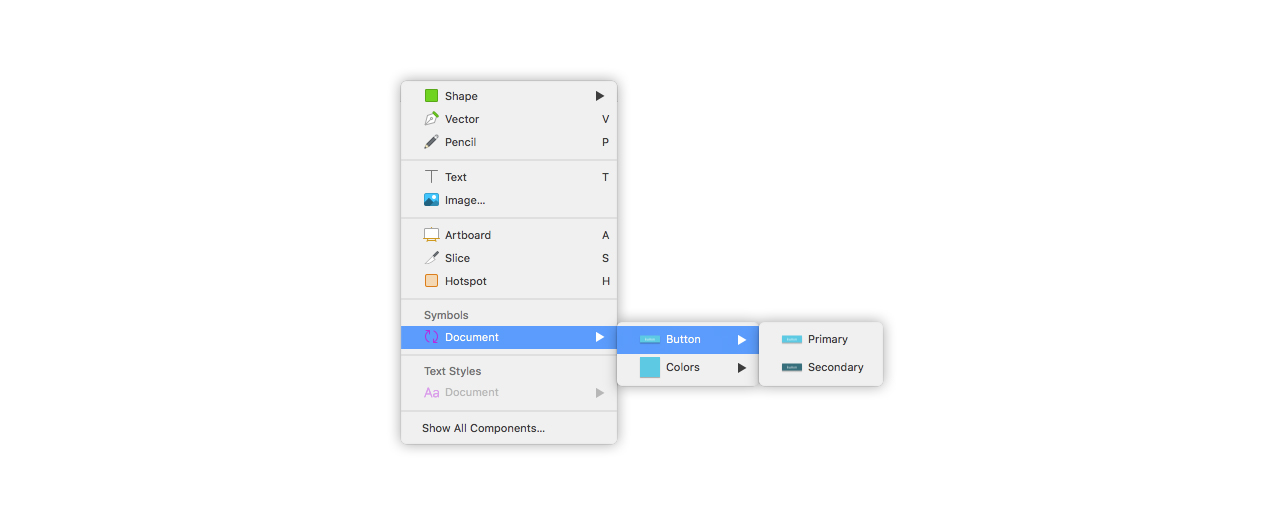
Drawing Symbols in an Organized Manner
Designing in an organized manner shall help in easy reworking on the task. One easy way is to use a slash in the symbol’s name. In this, the sketch will create a category with the part before the slash, naming it. This will place the symbol and name it with the slash. The same procedure can be used for many symbols under the same root that are connected by common factors like logic making it easy for the users to find it.
Naming Conventions
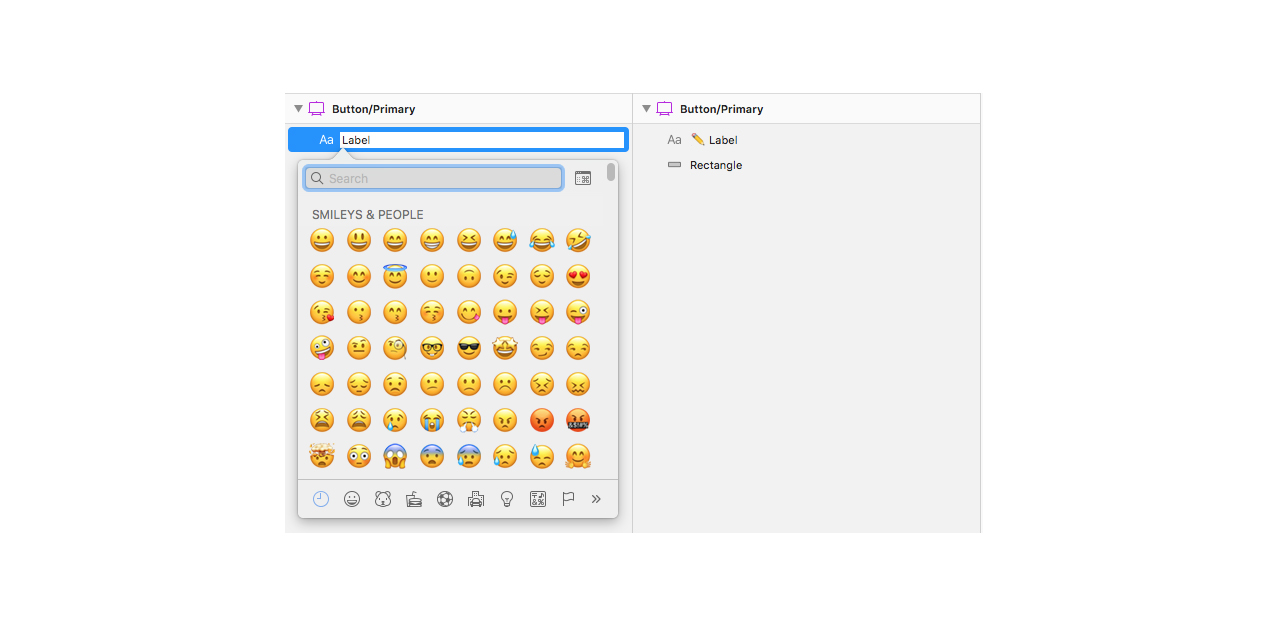
Every designer uses a convention to name the symbols and it is better to name it by the state and function of the symbols. It is better not to change the name of the symbol frequently and stick to one particular name for ease of work and identification. The designer can change the name inside the layers of the symbols and incorporate emojis in it. For this, they have to press control + command + space that opens up the emoji dialogue box.
Alternative to the Symbols Page
For any symbol that you create in the sketch, it is recommended to send it to the symbol’s page for ease of work. The symbols are listed one after another and in case, you delete any, the space in the list will be left blank. For the convenience of work, you can create a personalized symbol page instead of using the official one.
Replacing the Symbols
It is easy to replace the symbols with another from the menus given and selecting the one from the drop-down list. The new symbol that you use should be of the same size and position as that of the previous one. For this, you can click on the option ‘set to original size’ from the list.
Detaching
After you have made a symbol, it can be detached to identify the elements in it that help to form a group. To do this, you have to select ‘detach from symbol’ option from the drop-down list.
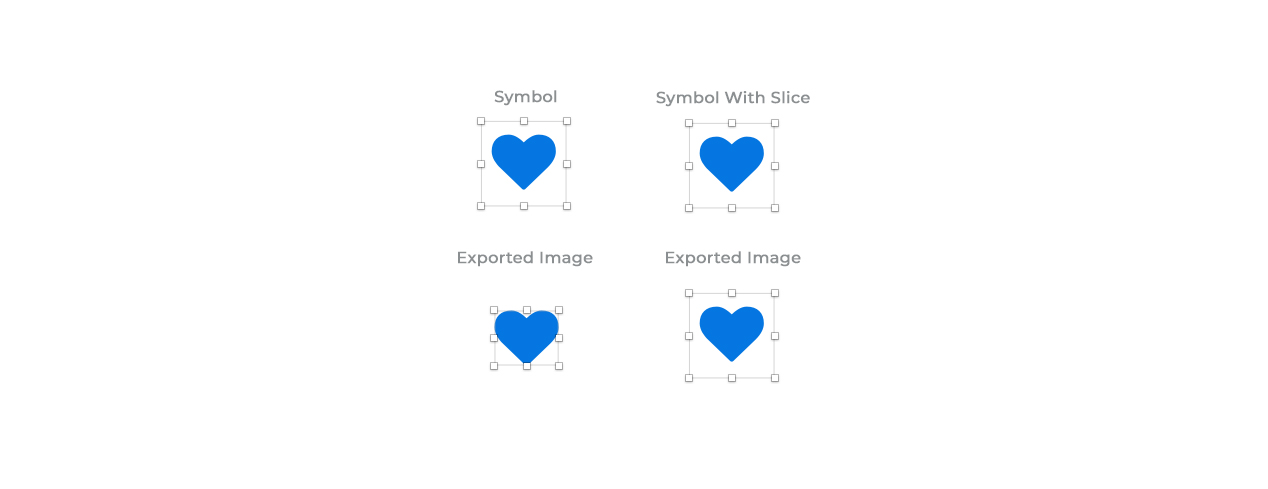
Using the Symbols as Assets
The symbols which are also known as elements can be used as bitmap images. For this, you have to mark the symbol elements as exportable. In case, the symbol has padding, when used in the sketch, it shall omit the blank space. To avoid this, you can use a slice. After creating the slice, you can place it on the blank ensuring that both are of the same size and do not come out of the boundary.
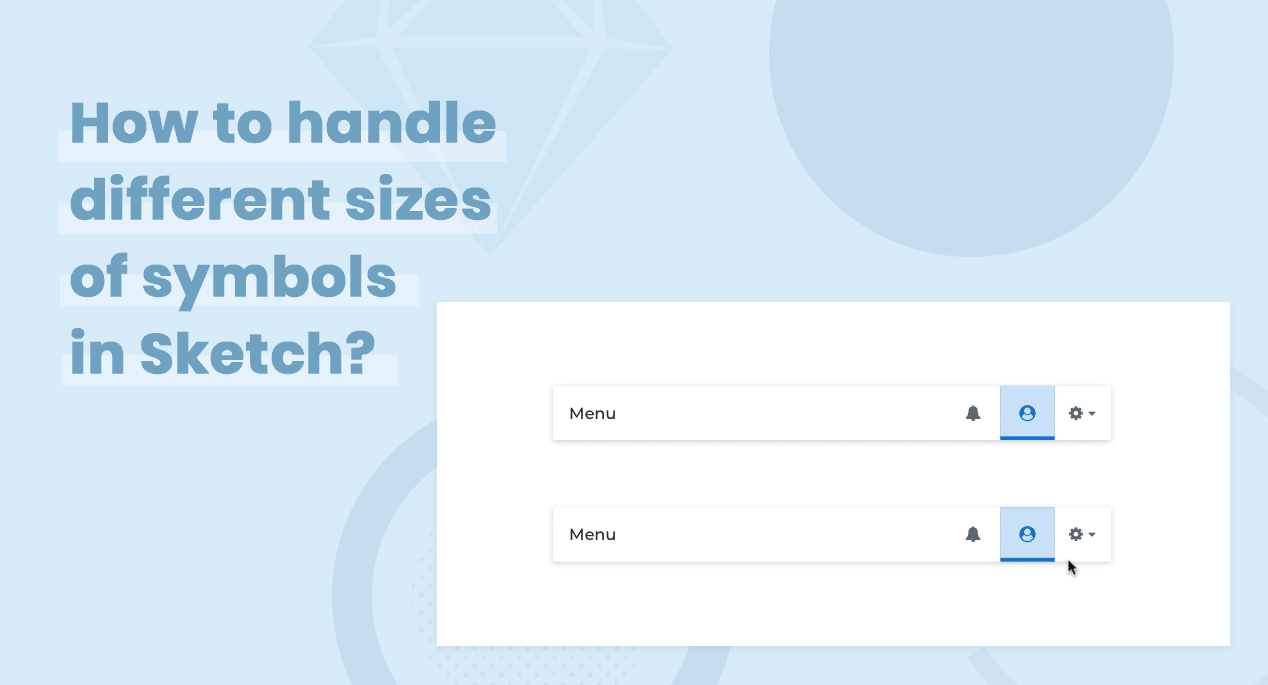
How to Handle Different Sizes of Symbols in Sketch?
Users can get to different screens of different sizes with different ratios. However, when creating the design, you have to ensure that the design is compatible with varying sizes of the screen. In this regard, it is easy if you do not have to design from the beginning and instead, you can resize the elements used in the designs. This can be done by using the resizing option in the symbols. Also, you can change the width and height of the elements without any problems. Make sure when changing one instance, it should not affect others.
How to Stretch the Elements in Symbols?
When stretching the symbol, you have to specify one particular shape along the side of its width. At this time, you can extend the width either horizontally or vertically.
How to Use the ‘Pin to Corner’ Option?
The ‘Pin to Corner’ options help to pin an element to its nearest corner, and in this, you cannot resize the element as you can maintain the same distance from the corner of the element. If you wish to use this option placing the object in the centre, there may not be any effect when using this option.
Resizing Objects
When choosing the option ‘resize objects,’ the element will continue to expand and kept an equal distance from each of the corners. Therefore, only after knowing the exact use of the function, you should use it in your sketch.
How ‘Float in Place’ Works?
With the help of this option, an object will remain of the same size maintain its relative position when measured from the boundaries of the symbol used in the sketch. There are some tips to follow when using this option and some of them are mentioned below.
Back to Original Size
With this, you can get the original size of the symbol if you are not happy with the result after resizing it. Just by clicking on the ‘set to original size’ you can get back its original form easily.
Using the Boundaries
The boundaries of the symbols are determined by the artboard and you can resize the boundary by selecting it. After this, you have to know how to resize it to fit in the given frame perfectly.
Using Characters and Operators
With the use of operators, you can change the width and height when using symbols in the sketches. To set a 200-pixel dimension of an element, you can enter characters like 100*2. Other than this, one can use add, subtract, divide and like operators. Other than the numbers, you can choose directions with the help of L for left, R for right, T for default, B for the bottom, M for middle, and C for the centre.
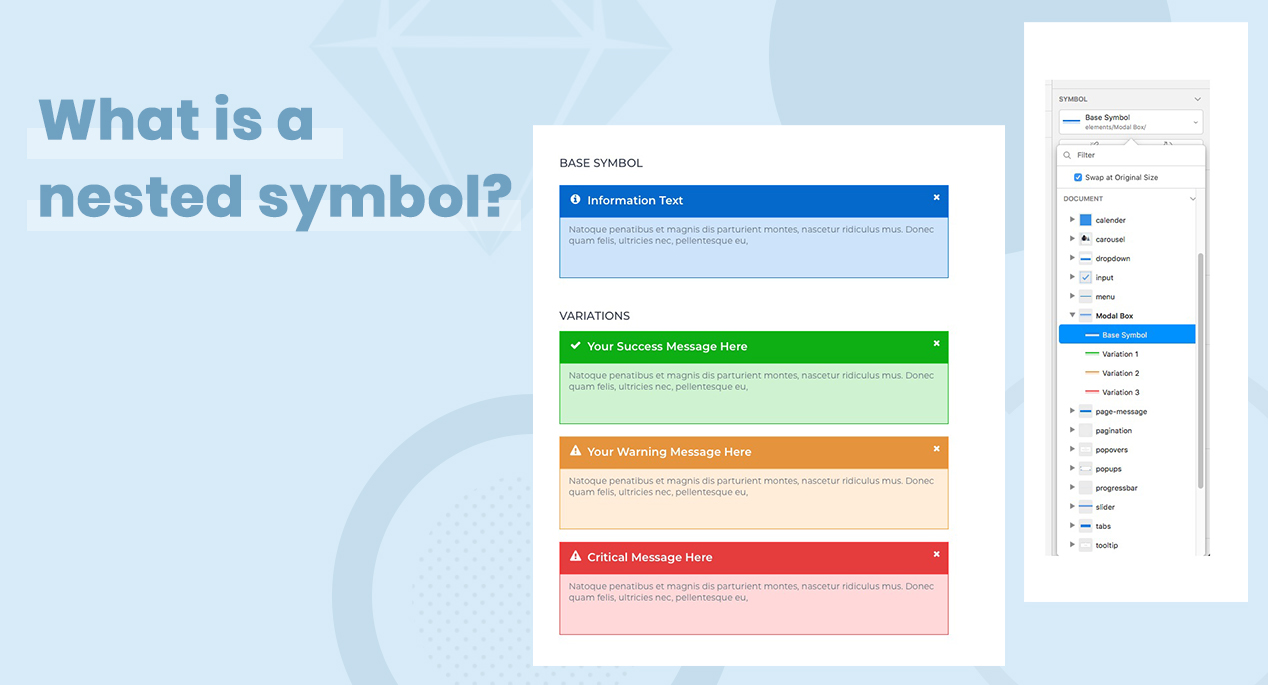
What are the Nested Symbols?
As the word goes, a nested symbol is one symbol with others into it. This is a new feature in the sketch that gives opportunities to combine different symbols. Also, you can place the symbols on top on another but ensure that you select then carefully. This shall help you get the desired new symbol by the perfect combination of two instances. Try to be moderate when using the nested symbols. Make sure that you integrate the symbols in the right manner. The nested symbols are commonly used in big organizations. So, if you wish to create variations of one symbol, nested symbols are a suitable option. An instance of the symbol process is mentioned below.
Pick one symbol to make it the base
Overlap the chosen symbol with other symbols depending on the case that you wish to create.
After this, you can create another symbol with the outcome of the symbol integration.
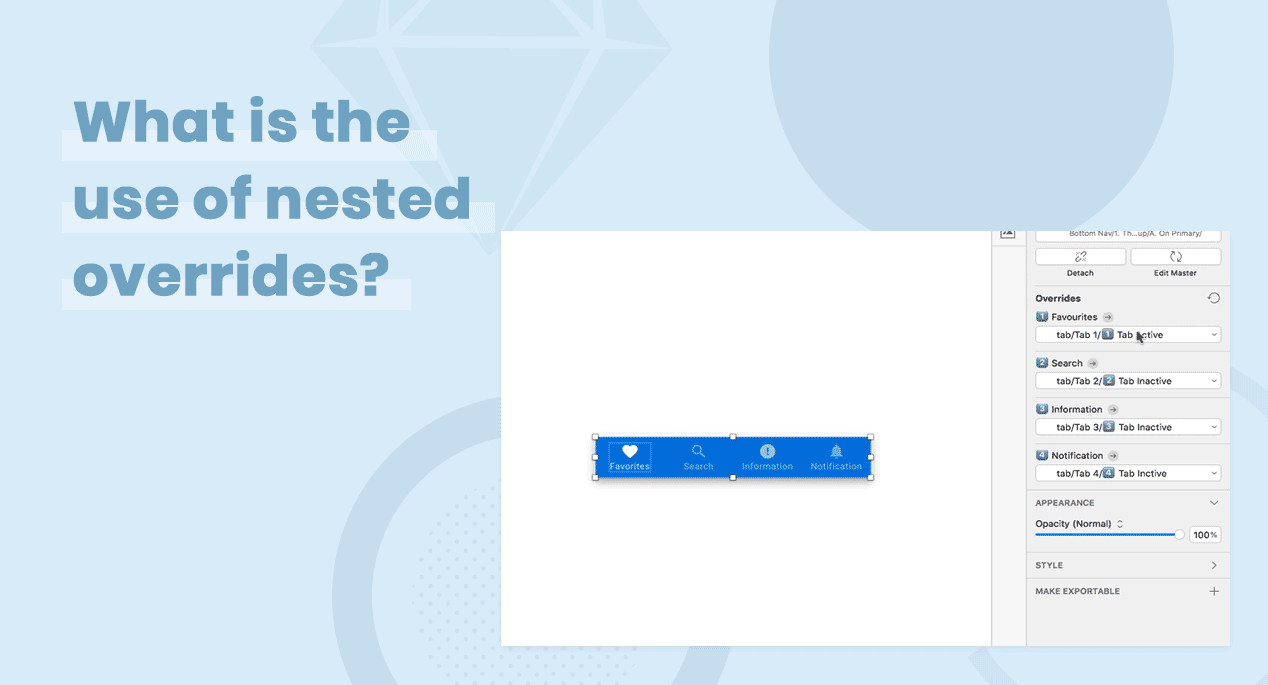
What is the Use of Nested Overrides?
The main use of the symbols is to make little changes with the use of a few elements. Therefore, when you have to create a lot of symbols, you should have proper control over them. In this regard, you can use nested overrides. The nested overrides can be used when you have to design a tab bar. The symbol with inactive tabs will be treated as the base. Also, there will be a different symbol for the highlighted tabs. Now, you can choose the one from the drop-down list that you wish to override.
However, it can be said that the override option applies both to bitmap images and texts along with symbols. Therefore, it is possible to use any instance of a symbol by incorporating the different images when you do not have to modify the symbol’s master.
In some instances, you do not want to insert an image as part of the symbol’s master. For this, it is better to create an empty PGN file without any visible content and then create a shape. Now, you can use the image as a pattern fill. With the help of symbol overriding, it is possible to replace the transparent image with the one that you want to use. Some tips for using the nested overrides are detailed in the following part of the article.
Names and Layer Orders
By naming and ordering layers correctly, it is possible to stay organized. By this, the layers will show up in a listed form under the ‘Overrides’ panel. The labels to the left of the input fields in the Inspector will respect the name and order you’ve previously defined inside the symbol itself, so you’d better pay attention to this order if you want to have a more efficient workflow.
Making the Right Size
By replacing one nested symbol with another, one can create a new symbol with the same height and width as the current element of the symbol.
Displacing the Elements Depending on the Text Length
When changing the text value in overrides option, by using the right option, you can move the element to its left. Apart from this, the secondary text should be placed on the right of the text. Make sure that there are less than 20 pixels of the distance between the two texts.
Avoiding the Use of Overrides
The symbols in the override section may look messy. In case, you do not want to an element to be overridden, you can hide its layer or lock it. This way, it will not come up on the list.
Hiding the Nested Symbols
If you wish to hide a nested symbol, Just select “None” from the Overrides section to hide a nested symbol. This will make the symbol hidden for the particular instance.
Hiding the Text
To make a text element disappear quickly in an instance, by using overrides. To do this, just set the text value to a blank space, pressing the space bar and the return key in the Overrides options.
Getting the Original Image
By incorporating an image into a symbol, it can be altered by using the override section. Here, you can use the original image by clicking on the option ‘Remove image override.’ Now, click on the image by clicking on the ‘choose image’ option.
Summing It Up
The sketch symbols are changing and making it easy for the designers to sketch. In addition to this, it is possible for better integration of the symbols. This helps in the teamwork of symbols where a number of designers are involved in accomplishing a project. With the use of the latest features used in the sketch, it makes the designs more functional. For easy accessibility of the software, it is recommended to use the latest version of the software. Therefore, by using the right tricks and techniques, it will be easy for the design professionals to give a unique touch to their design work.
Nisarg Pandya
Project Manager
Experienced Project Manager and Scrum Master at KrishaWeb, delivers expertise in Scrum methodologies, Laravel, React.js, UX design, and project management, ensuring efficient project delivery and agile implementation.